When shifting-left it is important to visualize and share the impact of changes directly to team members. So have you ever wondered how you could publish your test results? Using a specific pipeline task in Azure DevOps we can create a Test Dashboard to display and share our results. We can even create bug tickets directly from our overview!
Dashboard
The Dashboard in Azure DevOps can look something like this:

If you want to see the full implementation visit az.new!
In the top we can see a summary of all tests cases, the amount of passed, failed and other test cases. Also we can see the runtime and pass percentage. This also accounts to past test runs, so we can see if we are passing or failing more tests per run.
In order to create this dashboard we are going to write a small PowerShell script that will publish our tests results first locally as a XML file and use Azure DevOps task to pickup the XML and publish the results, that will create the dashboard accessible within Azure DevOps.
If you follow along on my article series Test Infrastructure as Code we are going to publish each step of the pyramid to immediately see at which stage the tests failed.
PowerShell Pester Task
First we need to run our pester tests, for that we can either use the Azure DevOps Pester Test Runner Build Task by Black Marble, or we can come up with our own implementation.
As I like to have the possibility to execute my pipeline locally and have the full flexibility and control of my pipeline I will opt for the implementation using PowerShell.
We are going to use Invoke-Pester and pass different parameters to publish a new test result file for each stage of tests.
Make sure Invoke-Pester get the correct OutputFormat = NUnitXml passed.
NUnitXml is the format of the test result output file, this needs to be set to be able to publish the test result using the Azure DevOps PublishTestResults task.
Also the location of the OutputFile should be considered. In many cases you can opt for well known Azure DevOps locations which are stored in predefined variables.
You can use the predefined variables of Azure DevOps $ENV:System_DefaultWorkingDirectory or $(Build.SourcesDirectory) of Azure DevOps to save the test file into the root folder of the agent.
The full PowerShell task implementation can look like this:
# Invoke-Pester.ps1

param(
  $TestResultsPath = $PSScriptRoot # or choose $ENV:System_DefaultWorkingDirectory
)

# Execute all tests that are located in the folder 'Test' relative to the script file.
# You can put this script in your root folder of the source files and adjust the ChildPath accordingly.
$testScriptsPath = Join-Path -Path $PSScriptRoot -ChildPath 'Test'
# Create the test results file relative to the script file with the name 'TestResults.Pester.xml'
# The Path can be adjusted and set e.g. to a predefined variable
$testResultsFile = Join-Path -Path $TestResultsPath -ChildPath 'TestResults.Pester.xml'

if (Test-Path $testScriptsPath) {
    $pester = @{pr
        Script       = $testScriptsPath
        # Make sure NUnitXML is the output format
        OutputFormat = 'NUnitXml'         # !!!
        OutputFile   = $testResultsFile
        PassThru     = $true # PassThru will allow us to get the output the invoke-pester as an object
        ExcludeTag   = 'Incomplete'
    }
    $result = Invoke-Pester @pester
}
Pipeline
When executing the pipeline the view could look like this.
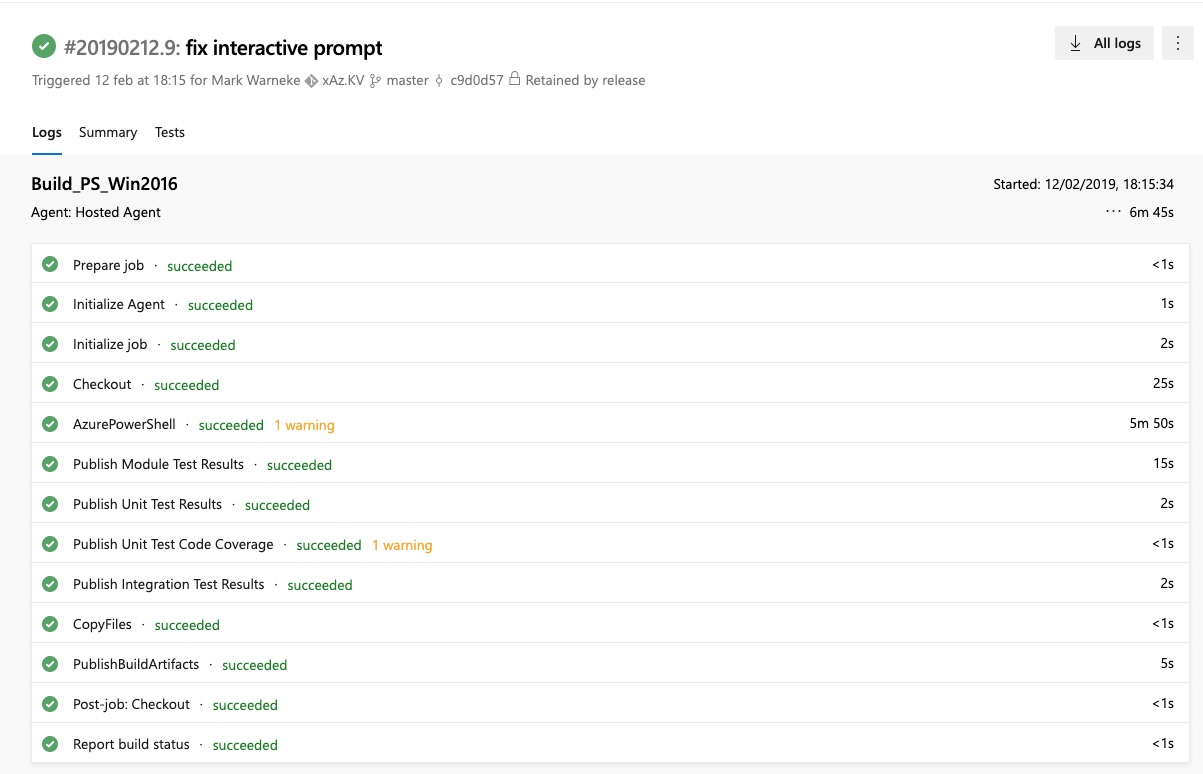
The pipeline will execute a PowerShell task - called AzurePowerShell and run three times the Publish Test Result functionality. Once for the Module specific tests, once for the Unit tests and once for the Integration tests. Only if these tasks are successful the pipeline is going to copy the files and publish the build artefact.
Make sure to set the PowerShell errorActionPreference: "continue" in order to continue on any error.
The testRunner: 'NUnit' needs to be set to NUnit and we want to fail the pipeline if we find a failed tests in our test results, so the publish task needs to be set to PublishTestResults: 'failTaskOnFailedTests'.
The complete YAML for the pipeline can look like this:
trigger:
  - master

variables:
  azureSubscription: "Mark"
  feed.name: "xAz"
  organization: "az-new"
  module.name: "xAz.Cosmos"

jobs:
  - job: Build_PS_Win2016
    pool:
      vmImage: vs2017-win2016

    steps:
      - checkout: self
        persistCredentials: true

      - task: AzurePowerShell@4
        inputs:
          azureSubscription: $(azureSubscription)
          scriptType: "FilePath"
          # The name of the script where the pester test setup is located
          scriptPath: $(Build.SourcesDirectory)\Invoke-Pester.ps1
          scriptArguments:
          azurePowerShellVersion: "latestVersion"
          errorActionPreference: "continue"

      - task: PublishTestResults@2
        inputs:
          # Make sure to use the 'NUnit' test runner
          testRunner: "NUnit" # !!!
          # Make sure the file name matches the file name you specified in the Invoke-Pester.ps1 script.
          # A possibility is to add this as a parameter to the script
          testResultsFiles: "**/TestResults.Pester.xml"
          testRunTitle: "PS_Win2016_Unit"
          # Make the whole pipeline fail if a test is failed
          failTaskOnFailedTests: true
        displayName: "Publish Unit Test Results"
        condition: in(variables['Agent.JobStatus'], 'Succeeded', 'SucceededWithIssues', 'Failed')

      - task: PublishCodeCoverageResults@1
        inputs:
          summaryFileLocation: "**/CodeCoverage.xml"
          failIfCoverageEmpty: false
        displayName: "Publish Unit Test Code Coverage"
        condition: and(in(variables['Agent.JobStatus'], 'Succeeded', 'SucceededWithIssues', 'Failed'), eq(variables['System.PullRequest.IsFork'], false))
Considerations
You might want to run multiple pester tests that execute different kind of tests.
For that I would recommend extending the yaml to have a pester test and a publish test result task per kind.
Or extend the Invoke-Pester.ps1 script to add multiple steps. Another way would be to create the script flexible by allowing more input parameters e.g. what files to test, tags to include or exclude and how to name the output file, etc.
Invoking the dynamic script with different parameters will allow DevOps to display the results faster in the UI, you can also parallelize the execution of different test stages. Publishing different results with different names gives you the option to drill down into groups of tests per kind, see the bottom of Test-Dashboard screenshot.
A good practice is also to enable exclusions, the script to execute the pester tests should therefore have a parameter that allows you to exclude certain scripts or even whole tags.
If you want to see the full implementation, visit az.new.